How I made use of WordPress “sticky posts” feature
As you may have already known, WordPress 2.7 introduces a lot of new features, among them are the hierarchical comment system, a brand new admin panel, and most interesting (for me) the ability to make a post “sticky”. This concept of sticky posts is not new, in fact it’s been around quite a while in forums and bulletin boards, but now it’s the first time we see it in blog world. Need I say how useful it is?
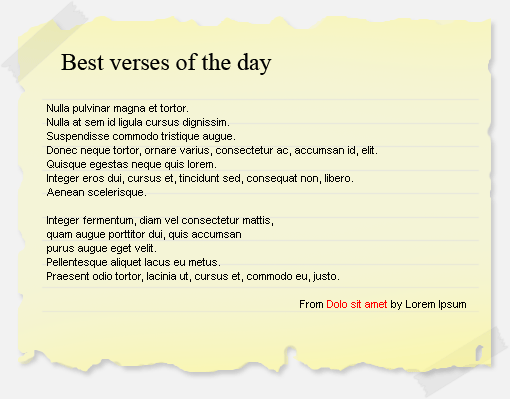
So, yesterday I came up with this idea: making use of “sticky posts” to stick something called “best verses” or “most refined verses” for my Thica.net which is dedicated to poetry. As its name tells, this special post is not a poem as normal ones, but contains some best verses (chosen by me ![]() ) only, and its content should be changed once every day or so. For this special mission, it should be decorated different to catch the eyes of users. After some hours playing with Photoshop, this is what I got:
) only, and its content should be changed once every day or so. For this special mission, it should be decorated different to catch the eyes of users. After some hours playing with Photoshop, this is what I got:

Then, I created a new post and marked it as “sticky”. This way, any query_posts() call will include it on the top.
You may notice, as this is a special post, I don’t need/want any comments and pings for it.
Now go to the code. Before any modification were made, the loop in my theme’s home.php page looks like this:
if (have_posts()) :
    while (have_posts()) :
        the_post();
        // html to display the post (poems) here...
    endwhile;
endif;
Now, for the sticky guy to come in on stage, I modified those lines a bit:
if (have_posts()) :
    while (have_posts()) :
        the_post();
        if (is_sticky()) :
            // specially html to that applies for the sticky post
        else :
            // html to display the NORMAL post (poems) here...
        endif;
    endwhile;
endif;
The condition tag is_sticky() tells us if the current post is sticky or not, and we decorate it respectively. In fact there’s another (more professional) way for this: using the new post_class() function. Calling this function inside the loop will generate some HTML code like this:
class="post sticky category-cat category-pets tags-dogsandcats"This comes very handy when you want full control over the CSS styles of each and every post you have. In this example, you may define these styles in your css:
.category-cat {
    /* let's say you want a specific background image for the posts inside "Cat" category */
    background: url('/images/bgr-cat.gif');
}
.category-dog {
    /* and a different one for "Dog" */
    background: url('/images/bgr-dog.jpg');
}
And, of course, in my case:
.sticky {
    /* whatever and however I want the sticky post to be */
}
So after all those changes, I tested everything on my localhost and push them LIVE. The final result isn’t that bad ![]() : http://www.thica.net
: http://www.thica.net
Now all I have to do is just updating that sticky post everyday with some good verses. One sticky post saves me tons of time, and opens endless customizations ahead. There’s indeed no limitation for those darn creative minds there at WordPress!
What others are reading
Loading…

